Battery switch on travel trailer function is crucial for managing your RV’s power. Understanding how this seemingly simple switch works can prevent frustrating breakdowns and keep your batteries healthy. This guide will walk you through the different types of switches, their wiring, troubleshooting tips, and important safety precautions to ensure smooth sailing on your next adventure.
We’ll cover everything from the basic function of the switch and how it interacts with your house batteries and charging systems (like solar panels and your tow vehicle’s alternator) to more advanced topics such as troubleshooting common problems and performing preventative maintenance. By the end, you’ll be confident in understanding and maintaining your travel trailer’s electrical system.
Battery Switch Types in Travel Trailers
Choosing the right battery switch for your travel trailer is crucial for managing your power sources efficiently and safely. Different types offer varying levels of control and protection, impacting how you use your house batteries and your vehicle’s charging system. Understanding these differences will help you select the best option for your needs.
Battery Switch Types and Their Characteristics
Travel trailers typically utilize a few main types of battery switches: single-pole, double-pole, and double-pole double-throw switches. Each offers unique functionality and is suited for different applications. Let’s examine each type’s advantages and disadvantages.
Single-Pole Battery Switches
A single-pole switch controls only one circuit. In a travel trailer, this usually means it controls either the positive (+) or negative (-) side of the battery bank. This is the simplest type of switch and is often used in smaller setups or as a basic disconnect.Advantages: Simple design, inexpensive, easy to install.Disadvantages: Offers limited control, doesn’t isolate both battery terminals simultaneously, potentially less safe than other options in some scenarios.
Double-Pole Battery Switches
Double-pole switches control both the positive (+) and negative (-) sides of the battery bank simultaneously. This provides a complete disconnect, improving safety by preventing accidental shorts.Advantages: Provides complete battery isolation, enhances safety by preventing accidental shorts, relatively simple operation.Disadvantages: Slightly more complex than single-pole switches, may be slightly more expensive.
Double-Pole Double-Throw (DPDT) Battery Switches
DPDT switches offer the most control. They allow you to select between two sources (like your house batteries and your tow vehicle’s charging system) or completely disconnect the house batteries.Advantages: Allows selection between multiple power sources, offers complete battery isolation, provides maximum flexibility.Disadvantages: More complex design, more expensive, requires a more thorough understanding of electrical systems for proper installation and use.
So, you’re an audiophile who travels? Awesome! Check out this guide on creating the perfect audiophile travel setup for pristine sound on the go. It’s all about packing smart, prioritizing quality over quantity, and knowing which compromises to make. Then, once you’ve got your portable setup dialed in, consider expanding your knowledge with resources like this other helpful article on audiophile travel setups for different budgets and listening preferences.
Remember, good sound doesn’t have to be bulky!
Comparison of Battery Switch Types
| Type | Advantages | Disadvantages | Applications |
|---|---|---|---|
| Single-Pole | Simple, inexpensive, easy installation | Limited control, potential safety concerns | Small trailers, basic disconnect |
| Double-Pole | Complete battery isolation, enhanced safety | Slightly more complex, slightly more expensive | Most travel trailers, improved safety |
| Double-Pole Double-Throw (DPDT) | Multiple power source selection, complete isolation, maximum flexibility | More complex, more expensive, requires electrical system knowledge | Larger trailers, complex electrical systems, need for source selection |
Function of the Battery Switch

The battery switch in your travel trailer is a crucial component of its electrical system, acting as a central control for power distribution and battery protection. It’s essentially a switch that allows you to connect or disconnect your house batteries from the rest of the trailer’s electrical system, and also influences how your trailer’s batteries charge. Understanding its function is key to maintaining your trailer’s electrical system and preventing problems.The battery switch manages the flow of power between your travel trailer’s house batteries and the charging sources, such as your tow vehicle’s alternator or a shore power connection.
When the switch is in the “on” position, it allows power from the house batteries to flow to the trailer’s appliances and lights. Simultaneously, it enables the charging system to replenish the batteries. Conversely, when the switch is “off,” it completely isolates the house batteries, preventing any drain from the trailer’s systems, even if something is accidentally left on.
Battery Switch and Power Flow Management
The battery switch is usually a multi-position switch, offering various configurations to control power flow. A common type has three positions: “Off,” “Battery,” and “Both.” The “Off” position completely disconnects the house batteries from the trailer’s electrical system. The “Battery” position connects only the house batteries to the trailer’s 12-volt system, allowing you to use the trailer’s appliances and lights while running solely on battery power.
The “Both” position connects both the house batteries and the charging system, allowing you to simultaneously use the trailer’s appliances and recharge the batteries. This is the typical setting when you are connected to shore power or have your vehicle charging the batteries. Improper use of the switch can lead to dead batteries or damage to electrical components, emphasizing the importance of understanding its functionality.
Preventing Battery Drain
A key role of the battery switch is to prevent unintended battery drain when the travel trailer is not in use for extended periods. By switching the batteries to the “off” position, you completely isolate them from the trailer’s electrical system. This prevents parasitic drain – the slow but steady depletion of battery power caused by small electrical draws from devices like clocks, smoke detectors, or even poorly insulated wiring.
Parasitic drain can easily drain a battery completely over several weeks, leaving you with a dead battery when you next want to use your trailer. Turning the switch “off” ensures your batteries are ready to go when you are.
Wiring and Connections
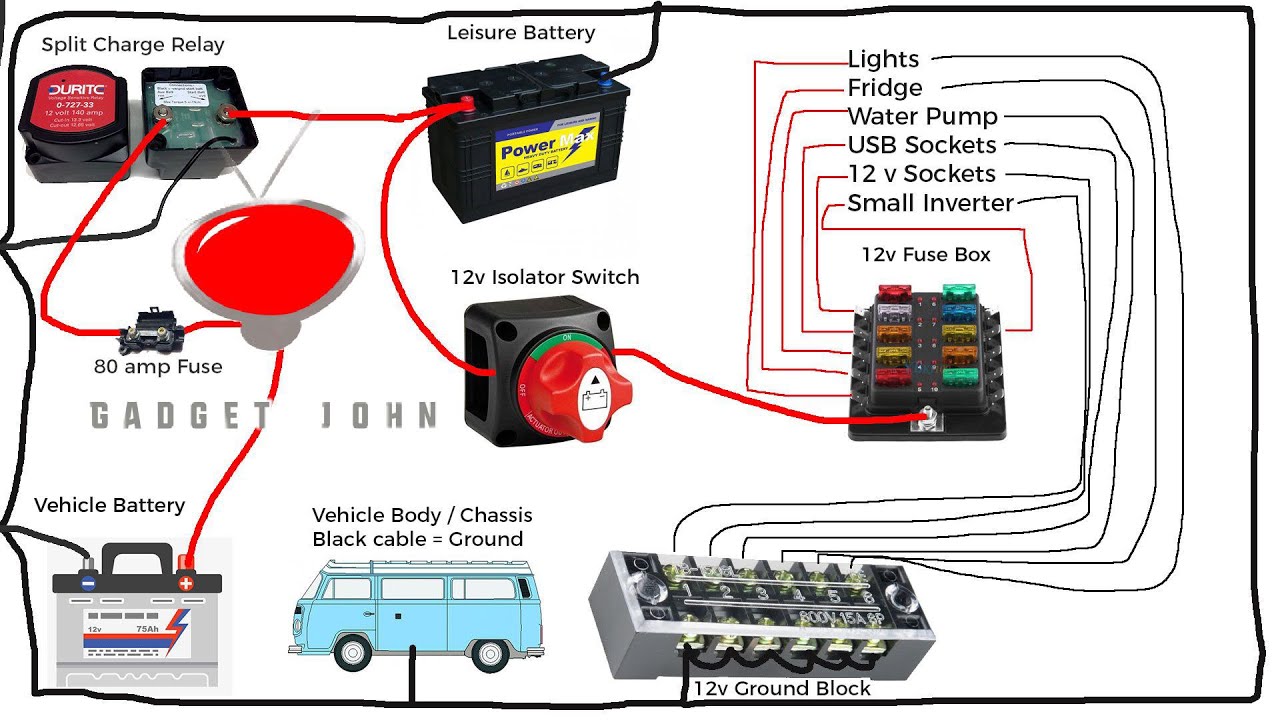
Getting the wiring right for your battery switch is crucial for the safe and reliable operation of your travel trailer’s electrical system. A poorly wired system can lead to power failures, damaged components, and even fire hazards. This section details the typical wiring setup and provides a step-by-step guide to ensure a safe and effective installation.
A typical travel trailer battery switch setup involves connecting the switch between the battery(ies) and the rest of the trailer’s electrical system. This allows you to isolate the batteries, preventing accidental drain or short circuits. The switch itself usually has multiple positions, allowing you to disconnect both batteries completely, connect only one, or connect both to the trailer’s system.
Typical Wiring Diagram
Imagine a simple diagram. At the top, you have your two batteries (Battery 1 and Battery 2). From each battery’s positive (+) terminal, a heavy-gauge wire runs down to the battery switch. These are the “input” wires. The battery switch itself has three or more terminals: one for each battery input, one for the output to the trailer’s electrical system, and potentially a terminal for a negative (-) bus bar connection.
From the output terminal of the switch, another heavy-gauge wire runs to the positive bus bar or distribution point in your trailer’s electrical system. All negative (-) terminals of the batteries are connected together via a separate, heavy-gauge wire to a negative bus bar, ensuring a complete circuit.
Visual Representation of Wiring Connections
Picture this: Two 12-volt batteries are side-by-side. A thick red wire runs from the positive terminal of each battery to a three-position battery switch. The switch itself looks like a small metal box with clearly labeled terminals. Another thick red wire exits the switch’s “output” terminal and leads to a larger distribution block, also labeled clearly, which in turn connects to the rest of the trailer’s 12-volt circuits (lights, pumps, etc.).
Thick black wires run from the negative terminal of each battery, connecting to a common negative bus bar (a metal strip with multiple connection points). This negative bus bar is then connected to the trailer’s chassis grounding system. This arrangement ensures a clean and safe power distribution system.
Step-by-Step Procedure for Connecting a Battery Switch
- Disconnect the Batteries: Before starting any wiring, disconnect both batteries from the trailer’s electrical system. This is crucial for safety.
- Mount the Battery Switch: Securely mount the battery switch in a readily accessible, dry location. Ensure it’s well-ventilated to prevent overheating.
- Connect the Positive Wires: Connect the heavy-gauge red positive wires from each battery to their respective terminals on the battery switch. Use appropriately sized ring terminals for secure connections and tighten them firmly.
- Connect the Output Wire: Connect the heavy-gauge red output wire from the switch to the positive bus bar or distribution block in your trailer’s electrical system. Again, use appropriate ring terminals and tighten securely.
- Connect the Negative Wires: Connect the heavy-gauge black negative wires from each battery to the negative bus bar. Ensure a solid connection. This negative bus bar should also be connected to the trailer’s chassis ground.
- Double-Check Connections: Carefully inspect all connections to ensure they are secure and properly tightened. Loose connections can cause overheating and potential fire hazards.
- Reconnect the Batteries: Carefully reconnect the batteries to the trailer’s system. Make sure everything is securely fastened.
- Test the Switch: Test the battery switch in each position (off, battery 1 only, battery 2 only, both batteries) to ensure proper functionality. Use a multimeter to verify voltage at various points in the system.
Troubleshooting Common Issues
So, your travel trailer’s battery switch is giving you trouble? Don’t worry, it’s a common issue, and often solvable with some basic troubleshooting. This section will guide you through identifying and fixing some of the most frequent problems. Remember safety first – always disconnect the battery before working on any electrical components.Troubleshooting a malfunctioning battery switch usually involves systematically checking power flow, connections, and the switch itself.
This process of elimination will help pinpoint the source of the problem, whether it’s a simple loose wire or a more serious issue requiring professional attention.
No Power to Appliances
If you’re experiencing a complete lack of power to your appliances, even with the battery switch turned on, several things could be at fault. First, verify that the battery itself is charged. Use a multimeter to check the battery voltage. A reading below 12 volts indicates a low charge, requiring recharging or replacement. Next, inspect the fuses both in the battery switch and the main electrical panel of your travel trailer.
Blown fuses are often the culprit, indicated by a broken filament visible through the fuse’s transparent casing. Replace any blown fuses with the correct amperage rating. Finally, check all connections at the battery switch, ensuring they are clean, tight, and corrosion-free. Loose or corroded connections can interrupt the flow of electricity.
Overheating Battery Switch
An overheating battery switch is a serious problem and indicates a significant electrical fault. This could be caused by a short circuit somewhere in the wiring system, a faulty switch itself, or an overloaded circuit. Never attempt to operate an overheating switch. Immediately disconnect the battery and inspect the wiring for any signs of damage, such as melted insulation or loose connections.
If you detect any problems, address them before attempting to use the switch again. If the overheating persists, the switch may need to be replaced.
Blown Fuses
Repeatedly blowing fuses suggests a persistent short circuit somewhere in the system. This shouldn’t be ignored; it can damage your appliances or even start a fire. Systematically check all wiring connections for any bare wires touching, frayed insulation, or other signs of damage. Pay close attention to the wiring near the battery switch itself, as this is a common area for problems.
If you cannot find the short circuit, consult a qualified RV technician.
Preventative Maintenance
Regular preventative maintenance can significantly extend the lifespan of your battery switch and prevent many common problems.
It’s crucial to perform these tasks to keep your battery switch functioning reliably and safely.
- Inspect connections regularly: Check for corrosion, loose connections, and any signs of damage at least twice a year, or more frequently if you use your travel trailer extensively.
- Clean connections: Use a wire brush and baking soda solution to clean any corrosion from the battery terminals and switch connections.
- Check fuses: Regularly inspect fuses for signs of damage and replace them if necessary. Keep spare fuses of the correct amperage on hand.
- Lubricate the switch: Apply a small amount of dielectric grease to the switch mechanism to ensure smooth operation and prevent corrosion.
- Avoid overloading circuits: Don’t connect too many appliances to a single circuit, as this can lead to overheating and blown fuses.
Battery Switch and Charging Systems
Your travel trailer’s battery switch plays a crucial role in managing how your batteries are charged, regardless of the source. Understanding this interaction is key to maximizing battery life and ensuring you always have power when you need it. This section explains how the battery switch works with different charging systems and its impact on overall charging efficiency.The battery switch acts as a gatekeeper, controlling the flow of electricity to and from your batteries.
When the switch is in the “on” position, it allows charging systems like your solar panels or alternator to supply power to your batteries. Conversely, when it’s “off,” it isolates the batteries, preventing discharge or accidental short circuits. This simple on/off function has a significant impact on how effectively your batteries are charged.
So, you’re an audiophile who travels? Awesome! Check out this guide on building the perfect audiophile travel setup for amazing sound on the go. It’s all about finding the right balance between portability and sound quality. Then, for some extra tips on maximizing your mobile audio experience, dive into this other resource on audiophile travel setups – it offers some clever solutions for space-saving and power management while you’re exploring new places.
Remember, good sound doesn’t have to stay at home!
Battery Switch and Charging System Interactions, Battery switch on travel trailer function
Different charging systems interact with the battery switch in slightly different ways. For example, solar panels typically connect directly to a charge controller, which then connects to the battery bank. The battery switch sits between the charge controller and the batteries. If the switch is off, the solar panels will still produce power, but that power won’t reach the batteries.
Alternator charging, on the other hand, usually involves a dedicated charging circuit that may or may not be controlled directly by the battery switch. Many systems incorporate a relay that automatically connects the alternator to the battery bank when the vehicle’s engine is running, bypassing the main battery switch in some configurations. In other setups, the battery switch may control the flow of power from the alternator.
Finally, shore power charging connects to a converter, which then connects to the battery bank, with the battery switch situated between the converter and the battery bank. A switch in the “off” position will prevent shore power from charging the batteries.
Impact of Battery Switch on Charging Efficiency
While the battery switch itself doesn’t directly impact the
- efficiency* of the charging process (the percentage of input power converted to stored energy), its position significantly impacts the
- effectiveness*. Leaving the switch in the “off” position, of course, prevents charging entirely. Even with the switch “on,” an improperly wired or faulty switch can introduce resistance, slightly reducing the charging rate and potentially generating unnecessary heat. This heat reduces efficiency by wasting some energy. A clean, well-maintained connection ensures optimal charging.
Charging System Performance with Different Battery Switch Configurations
The performance of different charging systems varies depending on the battery switch configuration. For instance, if your system utilizes a relay for alternator charging that bypasses the main battery switch, the switch’s position will have little to no effect on the charging from the alternator. However, it will still affect charging from solar panels or shore power. If your system does not utilize a relay and relies on the main switch to control alternator charging, then turning the switch “off” will halt all charging, irrespective of the source.
A properly functioning switch is essential for safe and effective charging from all sources. A poorly functioning switch could lead to undercharging or even damage to the charging system or batteries themselves. For example, if the switch is corroded or makes poor contact, it could overheat, causing damage to itself or nearby components. In another example, if the switch is left in the “off” position while using solar or shore power, your batteries will not charge, leaving you with a dead battery bank.
Safety Considerations: Battery Switch On Travel Trailer Function
Working with a travel trailer’s electrical system, especially the battery switch, requires careful attention to safety. Improper handling can lead to serious injury or damage to your equipment. Always prioritize safety when performing any tasks related to your trailer’s electrical components.Proper safety precautions are essential to prevent accidents and ensure a safe working environment. Understanding the risks involved and taking appropriate measures is crucial for both the installation and maintenance of your travel trailer’s battery switch and electrical system.
Failure to do so could result in electrical shocks, fires, or even explosions.
Safety Equipment
Before starting any work on your travel trailer’s electrical system, gather the necessary safety equipment. This will help protect you from potential hazards and ensure a safer working environment. The right tools and protective gear are crucial for preventing accidents.
- Insulated gloves: These prevent electrical shocks by providing an insulating barrier between your hands and the electrical components.
- Safety glasses: Protect your eyes from flying debris or sparks that may occur during work.
- Non-conductive tools: Use tools with insulated handles to avoid electrical shocks. Plastic or rubber-handled tools are ideal.
- Flashlight: A flashlight is essential for working in dimly lit areas, improving visibility and reducing the risk of accidents.
- Fire extinguisher: Keep a Class B or ABC fire extinguisher nearby in case of a fire. Knowing how to use it is equally important.
Preventing Electrical Shocks
Electrical shocks are a serious risk when working with a travel trailer’s electrical system. Taking preventive measures is paramount to ensuring your safety. Never assume the system is de-energized; always double-check.
- Disconnect the battery: Always disconnect the negative (-) battery terminal before working on any part of the electrical system. This will cut off the power flow and prevent accidental shocks.
- Verify power is off: Use a non-contact voltage tester to ensure the power is completely off before touching any wires or components.
- Work in a dry area: Avoid working in wet or damp conditions, as water can conduct electricity and increase the risk of shocks.
- Avoid wearing loose clothing or jewelry: These can get caught in moving parts or come into contact with live wires, potentially causing injury or a short circuit.
Preventing Electrical Fires
Electrical fires can be devastating and pose a significant risk when working with a travel trailer’s electrical system. Proper handling of components and adherence to safety guidelines are crucial to avoid such incidents. Always be aware of potential fire hazards.
- Inspect wires and connections: Regularly inspect wires and connections for any signs of damage, such as fraying, corrosion, or loose connections. Replace damaged components immediately.
- Use proper fuses and circuit breakers: Ensure that the correct fuses and circuit breakers are used for the appropriate amperage. Overloading circuits can lead to overheating and fires.
- Avoid overloading circuits: Do not connect too many appliances to a single circuit. Distribute the load across multiple circuits to prevent overloading.
- Proper ventilation: Ensure adequate ventilation around batteries and electrical components to prevent overheating. This is especially important in enclosed spaces.
Mastering your travel trailer’s battery switch is key to a worry-free RV experience. From choosing the right switch type for your needs to understanding how it interacts with your charging system and performing basic maintenance, this knowledge empowers you to keep your power running smoothly. Remember safety first, and don’t hesitate to consult a professional if you’re ever unsure about working with your RV’s electrical system.
Key Questions Answered
What happens if my battery switch is left in the OFF position?
Leaving the switch off completely disconnects your house batteries from all power sources, preventing drain but also leaving you without power for lights, appliances, etc.
How often should I check my battery switch?
Regularly inspect your switch for corrosion, loose connections, or any signs of damage. A visual check every few months is a good practice.
Can I use a battery switch from a different RV?
While it might seem possible, it’s best to use a switch rated for the amperage and voltage of your system. Using an incorrect switch could be dangerous.
My battery switch is hot to the touch. Is this normal?
No, a hot battery switch is a sign of a problem. Turn it off immediately and check for loose connections or other issues. Excessive heat could indicate a short circuit.
